Turbocharge Your Mac Development Environment
Last year, I switched from developing on a dual-boot Windows and Linux machine to working on a Mac. During the transition, I felt my productivity slump: not only was I missing keyboard shortcuts that I had become very accustomed to (such as Alt+←, for instance), but some native MacOS behaviour drove me crazy (like ⌘+Tab cycling through applications rather than cycling through windows of all applications). I also found the Mac terminal to be lacking, missing important utilities, and running some outdated binaries. So, vowing to prove decisively the superiority of humans over machines, I decided to make my Mac Just Work* ™ * Like my PC used to.
I'm writing this guide in case I fall through a time vortex and end up with a completely stock MacBook Pro again (you wouldn’t believe how often that happens to me). I’ve split things into three sections: terminal tweaks, awesome apps, and environmental enhancements. If you didn’t notice the brilliant alliteration, I cordially invite you to go back and reread that last sentence, I’ll wait.
Terminal tweaks
Meet Homebrew
Homebrew is a command-line package manager for macOS. Package managers are great, they help you maintain a clean and up-to-date system by allowing you to keep track of all of the software that you’ve installed using them. You’ve already used a package manager before, it’s called the Apple AppStore. But unlike the AppStore, Homebrew allows you to tap into a universe of open-source utilities that are designed to be run from the terminal command line.
Installing build tools
Open-source software is usually distributed as source code. This allows the same lines of code to be compiled into environment-specific executable files (binaries). In order to create binaries from source code, however, you need the appropriate build tools, such as gcc and make. Luckily, the macOS Xcode Command Line Tools include everything you need. Simply open a terminal window and type:
xcode-select --installFollow the prompts to complete the installation. Once that’s done, you can see a list of the goodies you just installed:
ls /Library/Developer/CommandLineTools/usr/bin/Installing Homebrew
Once you’ve got the build tools installed, you’re ready to download and install Homebrew. Just open a terminal and type:
/usr/bin/ruby -e "$(curl -fsSL https://raw.githubusercontent.com/Homebrew/install/master/install)"Follow the prompts to complete the installation.
Behind the magic
Behind the scenes, Homebrew is really just an awesome wrapper for Ruby and git. Let’s work through a sample Homebrew installation to see how it all works.
Let’s install wget
brew install wgetLet’s test that it worked
wget https://imgs.xkcd.com/comics/code_quality.png && open code_quality.pngIf hilarious xkcd comic popped up on your screen, you successfully installed wget using Homebrew. But what magic is this?
Let’s investigate…
Let’s just start by asking where wget is being run from
which wget

/usr/local/bin/wget
Interesting, tell me more
 ls -l $(which wget)

/usr/local/bin/wget -> /usr/local/Cellar/wget/1.18/bin/wget
So the installation process has actually compiled a specific version of wget (1.18), stored it in the Cellar directory, and symlinked the resulting binary file into /usr/local/bin, which has been added to my system path. Neat!
But wait, how did Homebrew know to do all of that magic?
Homebrew works by running Ruby files it calls formulas. If you want to see the steps by which brew install wget became an executable on your system, you need only read the formula:
brew edit wgetwhich, by the way, is simply a shortcut to:
vim /usr/local/Homebrew/Library/Taps/homebrew/homebrew-core/Formula/wget.rbSo there’s no magic here: you’re using Ruby formulas to build source stored inside of git repos, and the built binaries are being symlinked inside /usr/local/bin. Rad!
Okay, wait, where do these Ruby formulas come from? Homebrew ships with a core set of formulas that are stored within git repositories called taps. Since taps are just repos that store Ruby formulas, you can add your own taps and formulas! Homebrew actually maintain a list of third-party taps: https://github.com/Homebrew/brew/blob/master/docs/Interesting-Taps-%26-Forks.md
Neat, so how do I do the things?
To get you started, here’s a crash course on some of the commands you’ll use most often:
brew list – list all installed formulas
brew search – search for a formula
brew info | home | options – tells you more about a formula and its options, or takes you to the developer's page
brew install – installs a formula
brew link – symlinks the formula's installed files into the Homebrew prefix (this is done by default on install)
brew unlink – removes the symlinks to the formula's installed files (this is useful when you want to temporarily disable a formula)
brew update – updates Homebrew and fetches the latest list of formula
brew upgrade – updates a specific formula, or all of them
brew cleanup – removes older versions of an installed formula, or all of them
brew tap – lists the formula repositories Homebrew will search through, or adds a new one if specified
Alright, I’m a Homebrew ninja now, let’s install all of the things
I recommend you go through the below list one by one so you understand what you’re installing and why. brew info <
brew install wget bash bash-completion coreutils unrar moreutils findutils htop tree bash git grep openssh screen md5sha1sum node vim macvimTell your machine to use the updated bash:
Open a terminal and type in:
sudo -s
echo /usr/local/bin/bash >> /etc/shells
chsh -s /usr/local/bin/bash
Setup proper command-line autocompletion:
Using your favourite text editor, open up ~/.bash_profile and add:
if [ -f $(brew --prefix)/etc/bash_completion ]; then
 . $(brew --prefix)/etc/bash_completion
fi
Awesome apps
Okay, but what about apps that don’t get compiled from source? Like macOS applications and binaries? Homebrew handles these as well, through a special tap called Homebrew Cask. Open up your terminal and type:
brew tap caskroom/caskThat’s it. From now on, if you do a brew search you’ll notice some results are listed under Caskroom/cask. For these, you just need to install using the brew cask install <
Woot, let’s install all of the things!
Of course, you probably recognize a lot of the software below, and some, like text editors and IDEs, are truly a matter of personal preference. That being said, these are all items I find best-in-class at what they do. I’ve added notes below for some of the lesser-known entries.
brew cask install asepsis atom dropbox filezilla firefox flux iterm2 macdown moom phpstorm virtualbox sketch skype sequel-pro transmission tunnelblick vagrant vagrant-managerAsepsis: no .DS_Store pollution
Asepsis stops the .DS_Store pollution caused by the Finder browser. .DS_Store files store Finder preferences, and though they are hidden, they will pollute your working git branch and show up in an ls -ahl. Asepsis causes .DS_Store files to be created in a central folder instead.
Unfortunately, installation is a bit of a pain, because, Apple. Specifically, you’ll have to temporarily disable Apple’s System Integrity Protection (SIP), which you should never ever do (except for when you really really want to). SIP limits the root account, and specifically, restricts write access to the /System /bin /usrand /sbin directories. If you decide you’re too cool for rules and want to proceed with the Asepsis install, check out Mike Greiling’s excellent post, but here’s the TL;DR version:
- Create two files in your home directory to bypass the Asepsis version check:
touch ~/.no-asepsis-os-restriction
touch ~/.asepsis-suppress-update-errors- Reboot your machine and as it’s restarting, hold down ⌘+R to launch macOS Recovery
- Once you see the macOS Utilities screen, click on the Utilities menu up top, click on Terminal, and disable SIP:
csrutil disable; reboot- Your computer will now reboot. Once it’s back up and running, open a terminal window and install Asepsis:
asepsisctl install- Having installed Asepsis, you can now re-enable SIP. Reboot into recovery, launch Terminal, and enter:
csrutil enable; rebootThat’s it, no more .DS_Store files popping up willy-nilly. Even better, use this one-liner to recursively seek and destroy the existing ones:
find . -name '*.DS_Store' -type f -ls -deleteApptivate: Window's style Alt-Tab
On Windows, Alt+Tab cycles through application windows whereas on macOS, ⌘+Tab cycles through applications themselves. Sure, once you’ve cycled to the application you want, you can then cycle through its active windows using ⌘+` , but that’s a different experience than Window’s style Alt+Tab. If you want it to just work, and to manage global hotkeys in general, check out Apptivate.
Moom: Window’s style window management
On Windows, Alt+ arrow keys reposition a given window and resize it to take up half of the page. This is extremely useful in a variety of situations and I was surprised to find it missing in macOS. But fret not, Moom returns this behaviour, and allows for much more configurability to boot.
Environmental enhancements
This last section delves into fine-grained system and environmental tweaks. These will take a little more time to set up, but the investment is surely worth it!
Gitify your Mac / Bash defaults
Paul Irish keeps a beautifully commented bash osx defaults file ;that will help you fine-tune your macOS environment down to the smallest details. This file is just one of the many dot files in his https://github.com/paulirish/dotfiles/ repo. They’re called dot files because they’re the invisible configuration files (prefixed with .) that sit inside your Mac / Linux home directory and store your preferences.
Though you could read through Paul’s list and copy settings you like one at a time, the recommended usage is for you to fork his entire repository, change each file to your liking (or remove them entirely), and commit the changes to your own fork. Not only will this serve as a cloud backup for your preferred local configuration, but it will also allow you to make any foreign shell instantly more familiar.
For instance, in my fork of Paul’s repo, I’ve created a vagrant branch. One of the first things I do when I fire up a fresh Vagrant box is git clone my dotfiles repo, git checkout the vagrant branch, and run the symlink-setup.sh script (which creates symbolic links of the dot files in my repo inside my home directory). And just like that, a fresh Vagrant box has all of the aliases, shortcuts, vim preferences, and configuration defaults that I’m used to on my local machine.
Sandboxed development
Having a turbocharged development environment is great, but what if you’re working on multiple projects, or projects that require supporting cron jobs, java applets, and other services that you don’t want running on your local machine? Or, even more to the point, if you want to do your development in an environment that is as close to the production server as possible? This is where Vagrant and VirtualBox come in (and luckily, you’ve already installed both with Homebrew, above).
There are many ways to use and configure Vagrant, but I’m going to be narrowly focused on how to use it to configure a local Scotch Box LAMP machine. Vagrant has many plugins that can automate some of the below steps, but I’m avoiding them for now so we can see the magic that’s happening. Once you’ve got a fuller sense of all the pieces, you can install a Vagrant plugin simply by typing vagrant plugin install.
What is Vagrant?
Put simply, Vagrant helps you manage virtual machines. These can be local machines, such as the one we’re about to configure with VirtualBox, or they can be remote machines hosted in the cloud. Vagrant is also provider agnostic, which means that you can use it just as easily with Docker and Hyper-V. The creators of Vagrant maintain a list of many public boxes that you can download and use for free.
What is VirtualBox?
Put simply, VirtualBox allows you to run multiple sandboxed operating systems on the same machine. For instance, even though I’m running macOS, I can use VirtualBox to install Windows and Linux, and access those operating systems through my macOS environment. The best part is that I don’t have to modify my system in any way. For all intents and purposes, the virtual machines I create behave like any other app on my computer and can be just as easily installed or removed.
Okay, I’m with you so far, but what’s Scotch Box?
Scotch Box is a Vagrant box that’s based on Ubuntu 14.04 LTS. It’s been preconfigured with almost everything you will need for basic web development. So instead of starting with a bare install of Ubuntu and manually installing every package necessary in a LAMP stack, we’ll just use Scotch Box instead.
Wow, this sounds like a lot of work, how many million steps are there?
This is the best part! Working with Vagrant boxes is fast and efficient.
First, create a new project directory and, inside it, create a folder called www. Inside that folder, create another folder called public. And finally, inside the public folder, create an index.php file and put anything you want in it:
<?php phpinfo(); ?>Now, in the root of your project folder, create a file called Vagrantfile and paste the below Ruby script into it:
# -*- mode: ruby -*-
# vi: set ft=ruby :

Vagrant.configure("2") do |config|

 config.vm.box = "scotch/box"
 config.vm.network "private_network", ip: "192.168.50.50"
 config.vm.hostname = "dev.local"
 config.vm.synced_folder "www", "/var/www",
 :nfs => true,
 :nfs_udp => false

 config.vm.provider :virtualbox do |vb|
 ## uses nameservers based on host machine. fixes broken /etc/resolv.conf
 vb.customize ["modifyvm", :id, "--natdnshostresolver1", "on"]
 vb.customize ["modifyvm", :id, "--natdnsproxy1", "on"]
 ## change network card type for better performance
 vb.customize ["modifyvm", :id, "--nictype1", "virtio"]
 vb.customize ["modifyvm", :id, "--nictype2", "virtio" ]
 ## Display the VirtualBox GUI when booting the machine
 vb.gui = false
 vb.name = config.vm.hostname
 ## Customize the amount of memory on the VM:
 vb.memory = "2048"
 ## Lower time sync threshold
 vb.customize [ "guestproperty", "set", :id, "/VirtualBox/GuestAdd/VBoxService/--timesync-set-threshold", 1000 ]
 end

end
Once that’s done, your project’s directory structure should look like:
.
├── Vagrantfile
└── www
 └── public
 └── index.php
Now we just need to tell Vagrant to do its magic: while in the project root, type on the command line:
vagrant upThe first time you run this command, Vagrant will automatically download Scotch Box, which will take a few minutes. Then, it will configure VirtualBox, your local environment, and the virtual machine. You will also be prompted for your macOS user password, which you’ll need to type in.
That’s it! Now you can open up a browser window and navigate to http://192.168.50.50/ where you’ll see whatever you put inside your index.php file. If you change the contents of index.php and refresh your browser window, you’ll see the changes reflected in real time. Rad!
But wait, there’s more
The true power of this setup is that you can access the virtual machine you just created using SSH. In your terminal, navigate to the project directory above and type:
vagrant sshWithin a few moments, you’ll find yourself logged into your new local development server. This server is completely sandboxed from any other Vagrant projects you create, so you can go nuts and change any environmental variables, MySQL configurations, and Apache vhosts you want. And if you navigate to /var/www inside the Vagrant box, you’ll see all of the files that you placed inside your project’s www folder. Changes in this directory are bound both ways, so if you change a file while SSH’ed in the Vagrant box, your local copy will be altered as well.
You can even access the web through your new box. For instance, type in the terminal:
curl http://wttr.in/VancouverRegardless of the time of year, the result of the above command is likely to be a forecast for rain. #vancouverproblems.
To end your SSH session, just type exit on the command line.
So how does the file sync magic happen? It works through Network File System (which we stipulated in the Vagrantfile using :nfs => true). You can see the entry Vagrant makes to facilitate this by viewing your /etc/exports file (which, incidentally, is why you were prompted for your user password during the vagrant up).
And how is the Vagrant box you created being managed? All of that happens through VirtualBox and is managed by Vagrant. If you’re curious, launch the VirtualBox Manager and you’ll see that you now have a new machine called dev.local. The name of this machine, dev.local, was set in the Vagrantfile above.
And what about the port forwarding and networking magic? To see the magic, open the VirtualBox preferences, click on the network tab and double-click a Host-only Network adapter in the list:
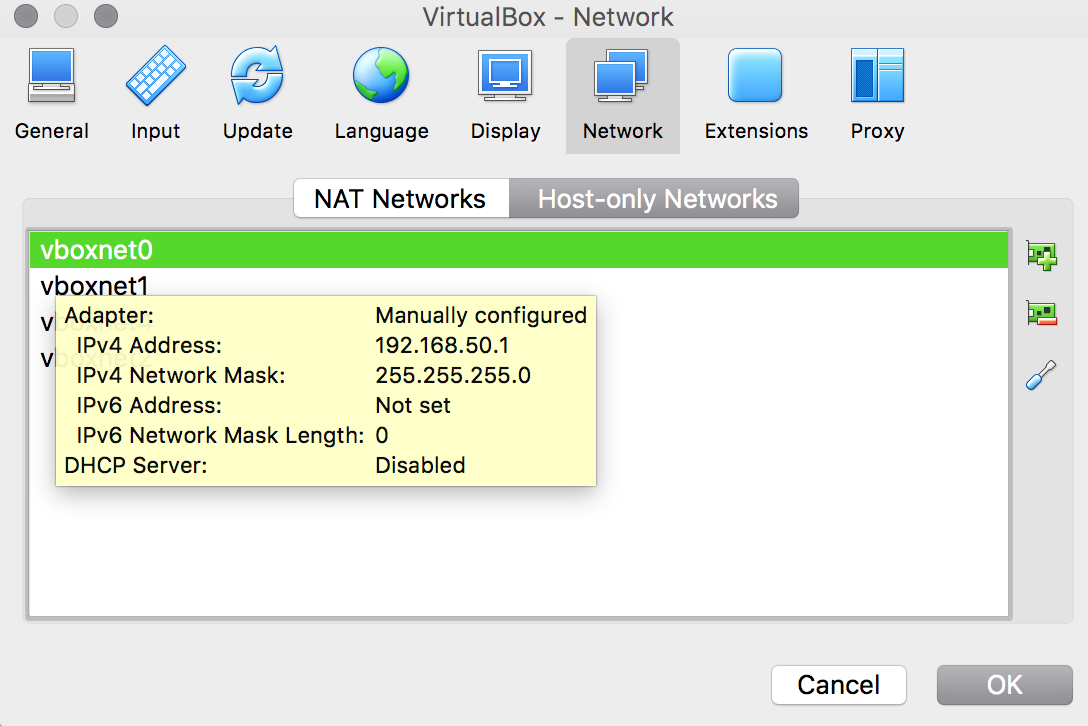
In our Vagrantfile, we stipulated an IP address of 192.168.50.50 for the virtual machine. To facilitate that, Vagrant created a VirtualBox adapter with an address of 192.168.50.1. This acts as a gateway for the virtual machine. Then, Vagrant configured a network interface inside the virtual machine and set its IP to 192.168.50.50. Sneaky Vagrant -- how you do that? You can see exactly where this is happening by logging back into the virtual machine (vagrant ssh) and viewing /etc/network/interfaces:
...
#VAGRANT-BEGIN
# The contents below are automatically generated by Vagrant. Do not modify.
auto eth1
iface eth1 inet static
 address 192.168.50.50
 netmask 255.255.255.0
#VAGRANT-END
Clever, Vagrant! But really, who wants to type in http://192.168.50.50/ to access a dev machine? Not me -- and that’s easily changed. All you need to do is to open your macOS /etc/hosts file and add the following lines:
192.168.50.50 dev.local
192.168.50.50 www.dev.local
Now your browser will resolve dev.local and www.dev.local to 192.168.50.50. And since we’ve seen how the magic works, we can install the vagrant-hostmanager plugin to automate the /etc/hosts additions in the future.
Finally, when you’re done working with the box you created and want to shut it down, you just need to type vagrant halt in the project directory.
So what now?
You’ve got vagrants at the terminal, and brews and casks in the cellar; what you do with all of that is up to you!